How To Use SSH Remote IoT On Mac Without Extra Hassle
Are you ready to dive into the world of secure remote access for your IoT devices using SSH on a Mac? If you’re here, chances are you want to simplify your workflow without complicating things. SSH is like a secret passageway that lets you control and manage remote devices securely, and doing it on a Mac is as smooth as butter—if you know the tricks. So, buckle up and let’s get started!
Let’s be honest, SSH can sound intimidating at first, but trust me, once you wrap your head around it, it’s super handy. Imagine being able to log into your IoT devices from anywhere, troubleshoot issues, or even run scripts—all from the comfort of your Mac. Sounds cool, right? Well, that’s exactly what we’re going to cover in this guide.
Now, before we jump into the nitty-gritty details, let’s quickly talk about why SSH is so important. In today’s connected world, security is key, and SSH (Secure Shell) is like a digital fortress that protects your data and commands. Whether you’re managing a Raspberry Pi or monitoring smart home devices, SSH ensures that your connection is encrypted and safe from prying eyes. Ready to learn more? Let’s go!
Read also:Amber Daniels The Rising Star Shining Brighter Every Day
What Is SSH and Why Should You Care?
SSH, or Secure Shell, is like a digital handshake that lets you communicate with remote devices securely. Think of it as a secret tunnel that only you and the device can access. It’s not just about logging in; SSH allows you to transfer files, run commands, and even automate tasks—all without exposing your data to the internet.
Here’s the deal: if you’re working with IoT devices, chances are you’ll need to access them remotely at some point. Whether you’re debugging code, updating firmware, or just checking status, SSH makes it all possible. Plus, it’s free, open-source, and supported by almost every modern device, including your trusty Mac.
Now, here’s the kicker: SSH isn’t just for tech wizards. With a little guidance, anyone can use it to manage their IoT devices like a pro. And that’s exactly what we’re going to show you today.
Setting Up SSH on Your Mac: The Basics
Before you can start using SSH, you’ll need to make sure it’s set up properly on your Mac. Don’t worry, it’s super easy. macOS comes with SSH pre-installed, so you don’t need to download anything. Here’s how you can check:
- Open the Terminal app on your Mac. You can find it in Applications > Utilities or just search for it using Spotlight.
- Type
sshin the Terminal and hit Enter. If you see a bunch of options pop up, congrats! SSH is already installed. - Now, to make sure your Mac is ready to connect to remote devices, type
ssh localhost. This will test your SSH connection to your own machine. If everything works, you’ll see a prompt asking if you want to continue connecting. Typeyesand hit Enter.
And that’s it! Your Mac is now ready to SSH into any device that supports it. But wait, there’s more. Let’s talk about how to connect to your IoT devices next.
Connecting to IoT Devices via SSH
Now that your Mac is set up, it’s time to connect to your IoT devices. Whether you’re using a Raspberry Pi, an Arduino with Ethernet shield, or any other smart device, the process is pretty similar. Here’s a step-by-step guide:
Read also:Schoolboy 9 The Rising Star Shaping The Future Of Music
Step 1: Find the Device’s IP Address
The first thing you’ll need is the IP address of your IoT device. This is like the device’s phone number—it tells your Mac where to find it on the network. Here’s how you can find it:
- Check the device’s settings or documentation for its IP address.
- If the device is connected to your Wi-Fi, you can usually find its IP address in your router’s admin panel.
- Alternatively, you can use tools like
nmapto scan your network and find connected devices.
Step 2: Open Terminal and Enter the SSH Command
Once you have the IP address, open Terminal and type the following command:
ssh username@ip_address
Replace username with the username of the device (usually pi for Raspberry Pi) and ip_address with the actual IP address of your device. Hit Enter, and you’ll be prompted to enter the password. Type it in (note that your password won’t show up as you type for security reasons), hit Enter again, and boom—you’re in!
Troubleshooting Common SSH Issues
Let’s face it, things don’t always go smoothly the first time around. If you’re having trouble connecting to your IoT device, here are a few common issues and how to fix them:
- Connection Refused: Make sure the device is powered on and connected to the same network as your Mac. Also, double-check the IP address.
- Permission Denied: This usually means the username or password is incorrect. Double-check your credentials and try again.
- SSH Not Enabled: Some devices require you to enable SSH manually. For example, on a Raspberry Pi, you can enable SSH by running
sudo raspi-configand selecting the SSH option.
If none of these work, don’t panic. There are plenty of resources online that can help you troubleshoot further. Just remember to keep your cool and take it one step at a time.
Advanced SSH Techniques for IoT Devices
Now that you’ve got the basics down, let’s talk about some advanced SSH techniques that can make your life easier when working with IoT devices:
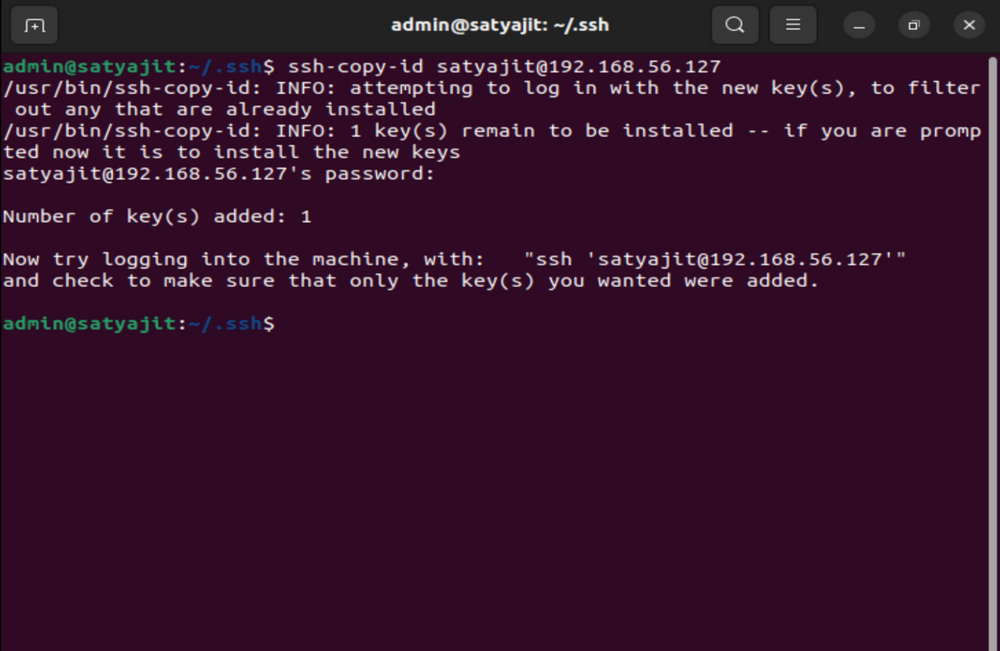
1. SSH Keys for Passwordless Login
Tired of typing in your password every time you connect? SSH keys are the solution. Here’s how to set them up:
- Generate an SSH key on your Mac by running
ssh-keygenin Terminal. - Copy the public key to your IoT device using
ssh-copy-id username@ip_address. - From now on, you can connect to the device without entering a password. Cool, right?
2. Port Forwarding for Remote Access
What if you want to access your IoT device from outside your local network? That’s where port forwarding comes in. By setting up port forwarding on your router, you can allow SSH connections from anywhere in the world. Just be careful—make sure your device is secure before exposing it to the internet.
Security Best Practices for SSH
While SSH is secure by default, there are a few things you can do to make it even more secure:
- Change the default SSH port (usually 22) to something less common. This makes it harder for hackers to find your SSH connection.
- Disable password authentication and use SSH keys instead. This eliminates the risk of brute-force attacks.
- Regularly update your device’s software and firmware to patch any security vulnerabilities.
Remember, security is a marathon, not a sprint. Stay vigilant and keep your devices protected.
Automation with SSH: Making Life Easier
One of the coolest things about SSH is that you can use it to automate tasks on your IoT devices. For example, you can write a script that checks the device’s status, runs updates, or even restarts it if necessary. Here’s a simple example:
ssh username@ip_address "sudo apt update && sudo apt upgrade -y"
This command will log into your device, update the package list, and install any available updates—all automatically. Pretty neat, huh?
Conclusion: Mastering SSH for IoT on Mac
And there you have it—a comprehensive guide to using SSH for remote IoT management on your Mac. Whether you’re a seasoned pro or just starting out, SSH is an incredibly powerful tool that can simplify your workflow and keep your devices secure.
So, what are you waiting for? Fire up your Terminal, connect to your IoT devices, and start exploring. And don’t forget to share your experiences in the comments below. Who knows, you might just inspire someone else to take the leap into the world of SSH and IoT!
Oh, and one last thing: if you found this guide helpful, be sure to check out our other articles on how to use SSH, troubleshooting SSH issues, and advanced SSH techniques. Until next time, happy coding!
Table of Contents
Article Recommendations